What Wood to Use for Building Closet Shelves
Do you have a closet in your abode that is large enough to transform into a more functional infinite? Maybe you can build closet shelving to make it more functional? Or maybe transform part of it as an role space? Learn how to transform your cupboard into a customizable closet assuasive you to change it up equally yous please.
Build to Organize Challenge
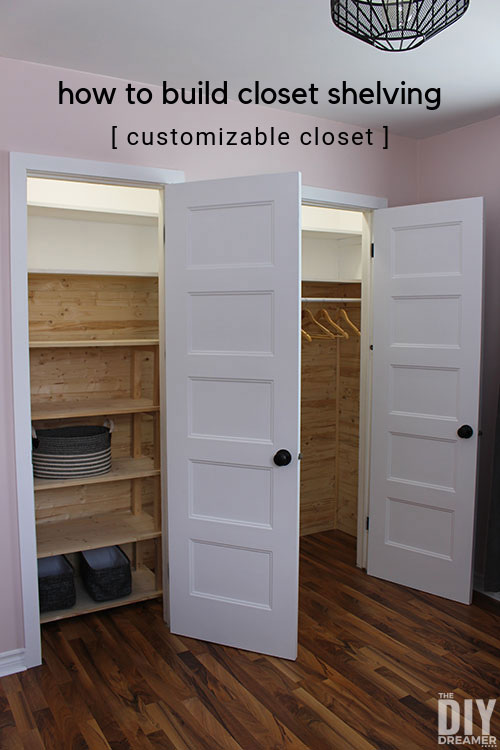
E'er since we started working on Gabrielle's bedroom, Gabrielle has been asking us when we were going to start working on her cupboard. Her sleeping room is on the smaller side only has a big two door cupboard.
For years we have told her that someday we would get rid of her dresser and change her closet so that all her clothing could go in there. The time has finally come, let me explicate why.
I will be collaborating for a twelvemonth with a agglomeration of wonderful bloggers on DIY project challenges: At Home DIY.
Every month we volition have a new DIY challenge to piece of work on. It's going to be and then much fun! This month's challenge is: Build to Organize Challenge. Which is the perfect challenge to become us working on Gabrielle's closet!
How to make a customizable closet
The reason backside having a customizable cupboard is to be able to switch it upwards easily equally the needs may change.
For case, right now we think it's best to become rid of Gabrielle's dresser and put all her clothes in the closet. Perhaps in a couple of years we will change our minds, and then nosotros rather non do anything permanent in her closet, particularly since it's the biggest cupboard in our dwelling.
In order to make a closet movable, everything needs to be hands modified: adapted for the current needs.
Hither's the cupboard before we started working on information technology:

Squeamish doors right? You tin see how they looked before we changed them up and before we painted her bedroom.
Like all the drawings on the walls? Ugh, I can't believe how many drawings are in that closet. We fixed it all up with some fresh pigment and some beautiful woods planks: how to plank a wall with wood paneling.

Adjustable cupboard rod
The first thing we did to make the closet customizable was to update the cupboard rod.
The electric current closet rod was eight' long and since information technology didn't accept a support in the eye, information technology dropped in the center.
We opted for an adjustable rod that goes from four' to 8'. Which ways nosotros tin can opt to alter it back to 8' hands.
We added a rod back up bracket in the middle of the dorsum wall.

We attached rod end brackets on each end of the closet side walls. This way if we want to fully extend the rod we can and we tin can as well easily switch sides if we rather have the rod on the other side of the closet.


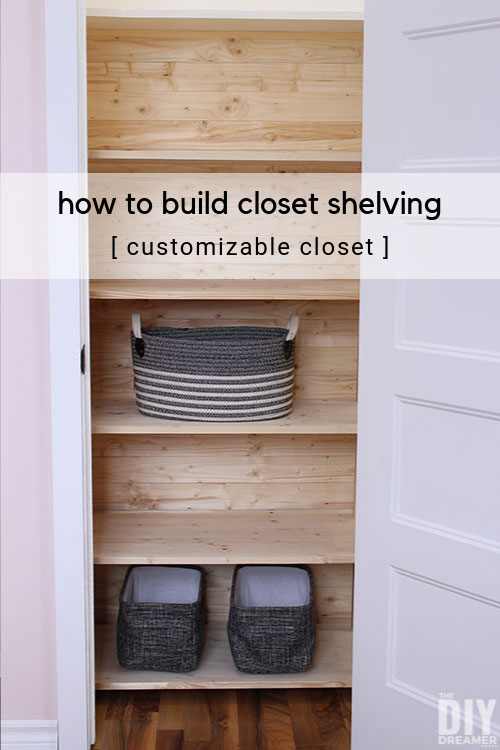
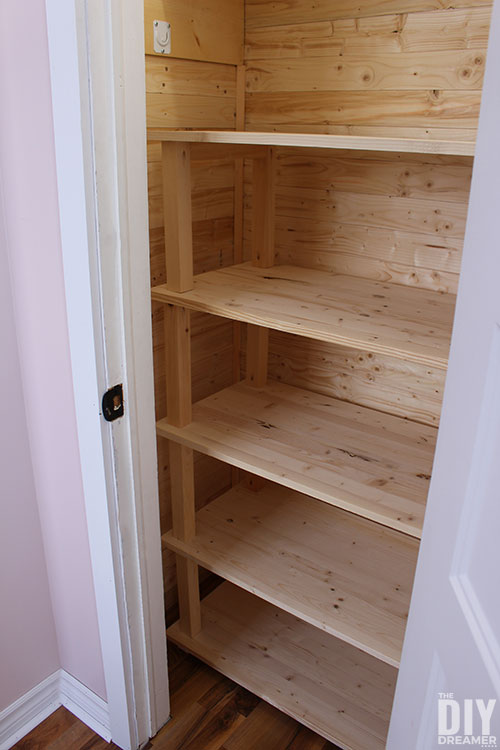
How to build closet shelving
To keep in the movable aspect of the closet, we opted to make open shelves to place clothes on. You could call it an open shelf bookcase fifty-fifty though we are using it for vesture. hehe
Nosotros wanted them to exist open in gild to allow as much light as possible to illuminate what is placed on the shelves.
Nosotros made certain to make them in a style that they can exist moved in and out of the closet if necessary.
This post also contains some chapter links for your convenience. Click here to read my full disclosure policy.
DIY Shelving for Closet
Supplies:
- 4x – two×2's 8′ long – Pine
- 5x – eleven/16x16x36″ Edge-Glued Panel "Hobbyboard" – Spruce *
- *Y'all tin can likewise buy longer boards and cutting them to size.
- 1.25″ forest screws #8
- i.l″ forest screws #viii
Tools:
- Mitre saw
- Clamps
- Kreg Jig
- Drill
Cut Listing:
- 16x – 12″ long pieces out of the ii×ii'south
- 8x – 10.5″ long pieces out of the 2×2's
- 2x – xiv″ long pieces out of the ii×2'south

Instructions
Step 1: Using our Kreg Jig Mini and a small clamp nosotros fabricated pocket holes in the pieces we cut.
We fabricated two pockets on the x.5″ pieces, one on each end.
We made two pockets on the 12″ pieces, ane on ane terminate and one on the inside of the opposite stop.


Step 2: With the help of our big clench, we dry out fitted our pieces together.
We placed i x.5″ piece with the pockets facing upwards in the eye and placed one 12″ on each end with the lesser pocket facing out (which means the superlative pocket is facing inwards).


Step three: Time to attach the pieces together.
Using our drill, nosotros screwed in 1.25″ screws into the pockets of the 10.5″ piece. By doing so, we accept a big U which we will be eventually attaching the big boards.
We repeated this pace until we had made 8 of them.


Footstep 4: We placed ane big board face up downwards onto a flat surface. Nosotros positioned a U on each terminate of the lath leaving a 1 one/8″ border.

Step v: We attached the U's onto the board using 1.25″ screws into the bottom pockets of the 12″ pieces. You'll noticed that one time fastened and flipped over, they await like tables.
We repeated this step until we had made iv.


Footstep vi: Nosotros took out the fourteen″ long pieces. Nosotros used a drill bit to make three vertical pockets into information technology, one on each cease and one in the middle.
To make sure we didn't drill too far, we put a slice of electric tape on the drill bit as a guide.


Step 7: Nosotros placed the terminal big board face down onto a flat surface. Nosotros put the 14″ long pieces on each end, 1 i/8″ edge. We attached them to the boards using 1.five″ screws, inserted into the pockets.


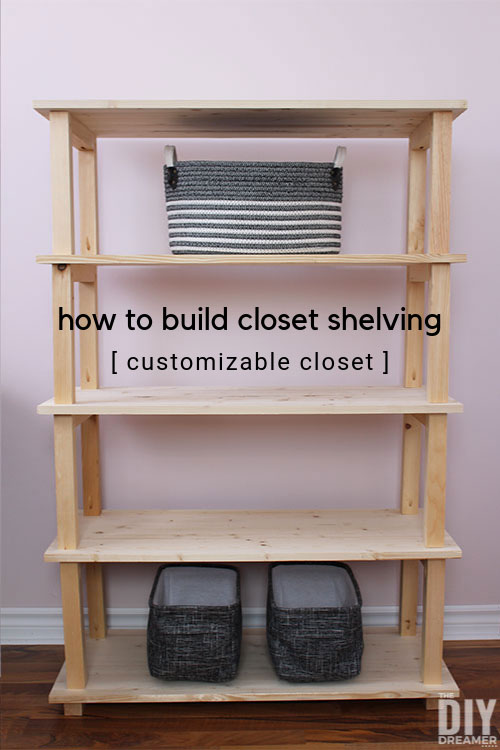
Pace eight: At present the really fun office attaching them all together to make the shelving.
Starting with the last lath we worked on, we placed it in the closet. We placed over it one of the "tables". We fabricated sure to place the feet ane 1/8″ from the edge of the bottom board.
We used the drill to insert 1.25″ screws into the bottom pockets of the legs (they were the originally the tiptop pockets).
One time all four legs were attached, we repeated the steps until all of the tables were attached.


Voilà we have a beautiful 54″ (4.5′) shelving in the closet:
DIY Custom Closet Organizer


Isn't it cute? Gabrielle can't wait to empty her dresser and make full the closet shelving with her clothing. I can't await to get the dresser out of her bedroom. hehe
We actually dear the natural tone of information technology with the natural plank wall. Information technology adds a cute touch with the rest of the closet being white. Don't you agree?
If you similar it equally much as we do, feel free to pin it!
Promise you have enjoyed this project and all the keen inspiration!
Have a GREAT weekend!
Christine
Materials
- 4x – 2×two'southward eight′ long – Pine
- 5x – 11/16x16x36″ Edge-Glued Console "Hobbyboard" – Spruce
- ane.25″ wood screws #viii
- ane.fifty″ wood screws #8
Tools
- Mitre saw
- Clamps
- Kreg Jig
- Drill
- Measuring tape
Notes
Cutting List:
- 16x – 12″ long pieces out of the 2×2'due south
- 8x – 10.5″ long pieces out of the 2×2's
- 2x – 14″ long pieces out of the 2×2's
Source: https://thediydreamer.com/diy/how-to-build-closet-shelving/
0 Response to "What Wood to Use for Building Closet Shelves"
Enviar um comentário